

In Free Fire, where every moment demands quick thinking and precise strategy, mastering the art of looting is essential for dominating squad duels. Securing the right locations early in the match allows players to gather weapons, armor, and essential resources efficiently, providing a decisive edge over opponents. Choosing areas with high-quality loot, strategic positioning, and ample cover can transform a squad from vulnerable to unstoppable, ensuring readiness for intense firefights.
Understanding the terrain, spawn patterns, and resource distribution within these zones empowers players to plan rotations, anticipate enemy movements, and maintain control throughout the game. This guide highlights the most effective looting areas, equipping squads with the knowledge to maximize efficiency, gain tactical advantages, and increase the likelihood of achieving victory.
Read More: Free Fire Skins 2025: How to Get Them for Free
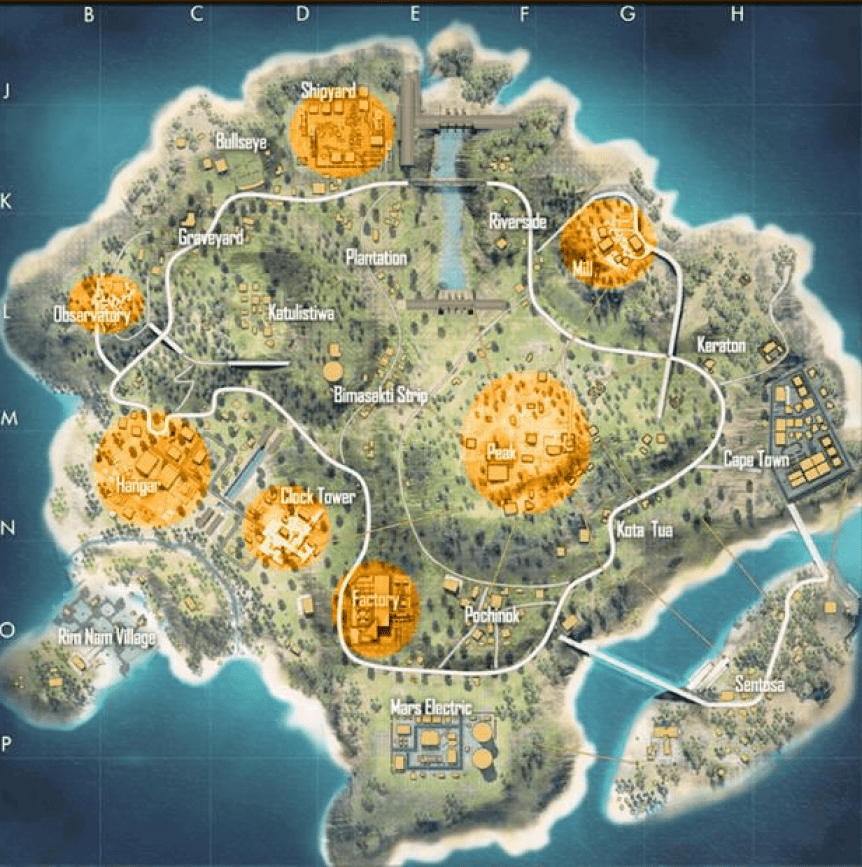
Top Looting Areas for Squad Duels in Free Fire
In Free Fire, securing the right loot is crucial for dominating squad battles. High-quality loot zones provide players with essential weapons, armor, and supplies, often determining the difference between victory and defeat. Understanding these hotspots and knowing how to navigate them efficiently is key to gaining a strategic advantage.
Golden Farm: A Looter’s Paradise
Golden Farm stands out as one of Free Fire’s most resource-rich locations. Packed with multiple buildings, supply crates, and valuable gear, it attracts squads looking for a strong start. However, its popularity makes it highly competitive. Players must loot swiftly and strategically, prioritizing key items while staying alert to rival squads that may be nearby. Proper planning can turn Golden Farm into a decisive advantage.
| Rewards | Location | Tips |
|---|---|---|
| High-quality weapons | Main buildings | Use drones to quickly scan the area |
| Defensive team | Peripheral houses | Avoid unnecessary confrontations |
| Medical supplies | Supply boxes outside | Jump off buildings if necessary |
Purgatory: The Abandoned City Brimming with Treasures
Purgatory is a deserted city teeming with valuable loot, making it a prime destination for squads seeking high-tier gear. Its crumbling buildings, narrow alleyways, and abandoned streets conceal supply crates and powerful weapons, rewarding players who explore thoroughly. Unlike more crowded zones, Purgatory demands strategic movement and keen awareness, as navigating its complex terrain while avoiding ambushes tests both skill and teamwork.
This area is perfect for players looking for a more challenging looting experience, offering both risk and reward in equal measure. Mastering Purgatory can provide squads with a tactical edge that can turn the tide of any battle.
| Rewards | Location | Tips |
|---|---|---|
| Rare weapons | Abandoned buildings | Use vehicles to move quickly |
| Stealth equipment | Underground and tunnels | Scout carefully to avoid ambushes |
| Energy supplies | Supply boxes on the streets | Use drones to monitor the perimeter |
Shangri-La: The Most Balanced Loot Zone
Shangri-La is renowned for its well-rounded loot opportunities, offering a strategic mix of modern structures and rural buildings. Players can find a diverse array of weapons, armor, and essential supplies, making it an ideal zone for squads seeking a steady, reliable start.
Unlike highly contested areas, Shangri-La provides a more balanced looting experience with moderate competition, allowing players to gather resources efficiently while preparing for mid- and late-game encounters. Its combination of accessibility, variety, and tactical positioning makes Shangri-La a favorite choice for teams aiming to build strength without immediately facing overwhelming opposition.
| Rewards | Location | Tips |
|---|---|---|
| Balanced weapons | Modern buildings | Explore the upper floors first |
| Movement team | Rural houses | Use vehicles to cover more ground |
| Medical supplies | Supply boxes in the yards | Avoid staying in one place |
How to Become the Best Free Fire Player in Squad Duels
Excelling in Free Fire squad duels requires a combination of strategy, skill, and teamwork. Victory depends not only on individual performance but also on how effectively you coordinate with your squad, choose landing zones, and optimize your gameplay. The following guide provides actionable strategies to help elevate your performance and dominate squad battles.
Communication and Team Coordination
Effective communication is the foundation of squad success. Maintaining constant contact with teammates allows for synchronized movements, better awareness of enemy positions, and efficient resource management.
- Share real-time information: Relay enemy locations, loot availability, and potential threats immediately.
- Assign clear roles: Designate roles such as sniper, support, or assault, and ensure everyone understands their responsibilities.
- Coordinate combat: Synchronize attacks and defenses to maximize damage output while minimizing casualties.
Strategic Landing Zone Selection
Choosing the right landing zone can significantly impact your early-game advantage. Aim for locations that balance loot quality, safety, and tactical positioning.
- Opt for resource-rich zones: Areas like Purgatory, Barricade, or The Factory provide high-quality gear to equip your squad effectively.
- Avoid highly congested zones: New or intermediate players should steer clear of hotspots like Shelter or Junkyard to reduce early confrontations.
- Consider map positioning: Land in locations that facilitate quick rotations to the safe zone and offer multiple escape routes if under attack.
What Is the Best Place to Drop in Free Fire?
Selecting the optimal drop location in Free Fire depends on your playstyle, skill level, and overall game strategy. The right drop spot can provide an early advantage, equipping you with weapons, gear, and positioning that set the tone for the rest of the match.
Key Factors for Choosing Drop Points
When analyzing potential drop zones, consider the following:
- Resources: Areas with high loot density allow you to quickly gear up with weapons, armor, and supplies.
- Safety: Safer zones let you gather resources without early interruptions, ideal for more cautious players.
- Encounter Chance: Aggressive players may prefer high-traffic areas to secure early kills.
- Vehicle Access: Easy access to vehicles ensures rapid rotations and safe escapes from danger zones.
Recommended Drop Spots
- Pavlov: This urban complex offers abundant resources and tall buildings for superior firing positions. Its proximity to the highway enables quick rotations and tactical retreats.
- Junk Yard: Perfect for safer drops, Junk Yard provides consistent loot through containers and small buildings, allowing players to gather equipment with minimal risk.
- Bamboo Grove: Rich in high-tier weapons, this location rewards skilled players but attracts heavy competition, requiring caution and awareness.
Strategies to Maximize Drop Efficiency
- Plan Your Skydiving: Identify buildings or areas likely to contain high-value resources before landing.
- Maintain Situational Awareness: Listen for gunfire and monitor enemy positions to avoid ambushes.
- Utilize Vehicles: Move efficiently to secondary locations when necessary to secure loot or evade threats.
- Use Maps and Landmarks: Familiarity with terrain and landmarks enables faster navigation and first access to key resources.
- Communicate with Your Team: Coordinate landings and resource collection to strengthen squad efficiency and control.
- Practice and Adapt: Every match is unique. Repeated practice at different landing zones helps refine decision-making and improves overall performance.
How to Identify and Navigate the Safe Zone in Free Fire
In Free Fire, the safe zone is the area where players remain protected from the storm or damage caused by the red ring. Understanding its location and timing is crucial for survival and tactical advantage. Here’s a detailed guide on how to identify and move to the safe zone efficiently.
How to Determine the Current Safe Zone
- Monitor the Minimap: The minimap in the top-right corner shows the current safe zone. Its position and size change as the match progresses, so always keep an eye on it.
- Listen to Announcements: The game provides alerts when the safe zone is shrinking or about to change. These cues are essential for planning your movements.
- Observe the Ring Color: The red ring indicates areas that will soon be damaged by the storm. Avoid entering it to prevent unnecessary damage.
- Check the Storm Meter: This on-screen indicator shows how much time is left before the storm begins to deal damage. Ensure you are inside the safe zone before it closes.
How to Identify the Next Safe Zone
- Watch the Red Ring on the Minimap: The contracting red ring shows the next safe zone. Make sure you are inside it before it fully closes.
- Heed Voice Announcements: Free Fire provides verbal alerts when the next safe zone appears. Use these cues to plan your next move.
- Plan Your Route: Use the minimap to chart a safe path to the zone. Avoid traversing the red ring or high-risk areas.
Efficient Movement to the Safe Zone
- Use Vehicles: If the safe zone is far, vehicles can help you reach it quickly, reducing exposure to the storm.
- Avoid Dangerous Areas: Navigate carefully, using cover and high ground to avoid ambushes from other players.
- Maintain a Direct Path: Stick to the most efficient route to conserve time and minimize storm damage. Straying too far increases risk.
Mastering safe zone navigation not only ensures survival but also provides opportunities to control positioning, ambush enemies, and dominate the late game.
What Does KDA Mean in Free Fire Squad Duel?
In Free Fire, particularly in Squad Clash mode, KDA stands for Kills, Deaths, and Assists. This metric is a key indicator of a player’s performance, measuring how many enemies they have eliminated, how many times they have been eliminated, and how often they have assisted teammates in securing kills. A higher KDA generally reflects stronger gameplay, as it shows a player is contributing more to eliminations while minimizing deaths.
How Is KDA Calculated?
KDA is calculated using the formula: KDA=Kills + AssistsDeaths\text{KDA} = \frac{\text{Kills + Assists}}{\text{Deaths}}KDA=DeathsKills + Assists
- Kills: Total enemies you have eliminated.
- Deaths: Number of times you were eliminated.
- Assists: Times you helped teammates eliminate enemies, such as dealing damage before they finish the kill.
Example: If you have 10 kills, 5 assists, and 2 deaths, your KDA is calculated as: (10+5)/2=7.5(10 + 5) / 2 = 7.5(10+5)/2=7.5
Why Is KDA Important in Squad Duels?
- Personal Performance Indicator: KDA helps evaluate your individual impact in a match, highlighting strengths and areas to improve.
- Team Coordination: A high team KDA reflects effective communication and strategy, boosting your squad’s chances of winning.
- Tournament Metrics: In competitive play and official tournaments, KDA is often used to rank players and teams, influencing standings and rewards.
Maintaining a strong KDA demonstrates both skill and teamwork, making it a vital metric for players aiming to dominate Free Fire squad duels.
Frequently Asked Questions
What is the best landing spot in Free Fire?
The best landing spot depends on your playstyle. Aggressive players may prefer high-traffic zones like Bamboo Grove for early kills, while cautious players benefit from safer zones like Junk Yard or Shangri-La to gather resources without immediate confrontation.
How do I know where the safe zone is?
The safe zone is indicated on the minimap, and the red ring shows where the storm will appear next. Listen to in-game voice announcements and monitor the storm meter to ensure you reach the safe zone on time.
What does KDA mean in Free Fire?
KDA stands for Kills, Deaths, Assists. It measures a player’s performance by calculating the total kills and assists divided by deaths. A higher KDA reflects better individual and team performance.
How can I improve my squad duel performance?
Focus on communication, coordination, and role assignment. Strategically choose landing zones, maintain situational awareness, and practice effective rotations to maximize survival and combat efficiency.
Which areas offer the best loot in squad duels?
High-resource areas include Golden Farm, Purgatory, Pavlov, and Bamboo Grove. Each zone has unique advantages, such as high-tier weapons, multiple supply crates, or strategic positioning.
How can I safely move to the safe zone?
Use vehicles for long distances, follow direct routes, avoid high-risk areas, and utilize cover and high ground to minimize exposure to enemy fire while moving.
Conclusion
Mastering Free Fire squad duels requires a blend of strategy, skill, and teamwork. From choosing the right landing spots and looting efficiently to maintaining awareness of the safe zone and optimizing your KDA, every decision can influence the outcome of a match. Coordinating with your squad, communicating effectively, and adapting to dynamic situations ensures not only survival but also a competitive edge over opponents.